Making Tmux settings permanent with Home Assistant
If you’ve ever tried customising tmux on Home Assistant OS, you’ll have noticed one frustrating thing: your changes don’t survive reboots.
💡 Why this happens
Home Assistant OS is largely immutable. Many user-level config changes (like.tmux.conf) don’t persist or get overwritten during startup.
After a fair bit of trial and error, I landed on a simple and reliable workaround.
🧠 The Idea
Instead of fighting the system, let it initialise normally… then patch tmux afterward.
⚙️ ApproachStore your custom config in/config(persistent)Use a startup script to inject it into.tmux.conf
📁 Step 1: Create a Persistent Tmux Config
Create the file /config/tmux_additional.conf with the following content:
# Change Bind Keys
set -g prefix C-a
unbind-key C-b
bind-key C-a send-prefix

# Change bottom of the screenbar colours
set -g status-style "fg=white,bg=blue"

# Basic Settings
#set-option -g mouse on           # Enable mouse support
set-option -g history-limit 10000 # Increase scrollback buffer
set-option -g escape-time 0      # Reduce escape delay

# Tmux Plugin Manager (TPM) setup
set -g @plugin 'tmux-plugins/tpm'
set -g @plugin 'tmux-plugins/tmux-sensible' # Sensible defaults

# Initialize TPM (add at the very end of the file)
run-shell "~/.config/tmux/plugins/tpm/tpm"
📌 Note
The/configdirectory is persistent on Home Assistant OS, so anything stored here survives reboots.
⚡ Step 2: Create the Init Script
Now create the script to add the additional configuration on startup, /config/fix_tmux_init.sh:
#!/bin/bash

echo "source /config/tmux_additional.conf" >> ~/.tmux.conf
This appends a line telling tmux to load your custom config.
🚀 Step 3: Run It on Startup
You’ll need to ensure this script runs during system startup.
🔧 OptionsAdd it to an init scriptCall it via a Home Assistant automationCall it using the app page's settings
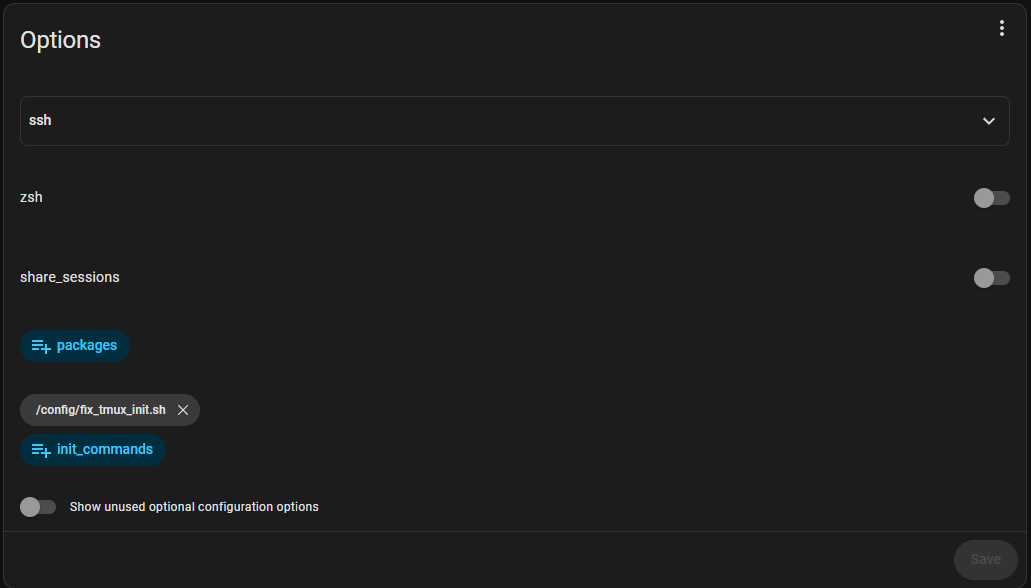
The key requirement: it runs after the user environment is ready.
🧪 Why This Works
✅/configis persistent
✅.tmux.confis rebuilt/reset
✅ Script re-injects your config every boot
It’s simple, slightly hacky—but very effective.
⚠️ Gotcha: Duplicate Entries
One issue: this script appends the same line every time it runs.
⚠️ Problem
You’ll eventually end up with multiple identicalsourcelines in.tmux.conf. While this isn't actually an issue for the advanced shell running in a docker container like on the yellow, it is best practice.
✅ Improved Version
This ensures the line is only added once.
#!/bin/bash

grep -qxF 'source /config/tmux_additional.conf' ~/.tmux.conf || echo 'source /config/tmux_additional.conf' >> ~/.tmux.conf
🧰 Make It Executable
Don’t forget to run:
chmod +x /config/fix_tmux_init.sh
💬 Final Thoughts
Home Assistant OS isn’t designed for deep shell customisation—but with a few small workarounds, you can still tailor your environment.
🧩 What this gives youPersistent tmux configClean separation of custom settingsEasy future tweaksIf you spend a lot of time in the terminal on your Home Assistant Yellow, this makes a noticeable difference.
About the author
Tim Wilkes is a UK-based security architect with over 15 years of experience in electronics, Linux, and Unix systems administration. Since 2021, he's been designing secure systems for a telecom company while indulging his passions for programming, automation, and 3D printing. Tim shares his projects, tinkering adventures, and tech insights here - partly as a personal log, and partly in the hopes that others will find them useful.
Want to connect or follow along?
LinkedIn: [phpsytems]
Twitter / X: [@timmehwimmy]
Mastodon: [@timmehwimmy@infosec.exchange]
If you've found a post helpful, consider supporting the blog - it's a part-time passion that your support helps keep alive.
⚠️ Disclaimer
This post may contain affiliate links. If you choose to purchase through them, I may earn a small commission at no extra cost to you. I only recommend items and services I’ve personally read or used and found valuable.
As an Amazon Associate I earn from qualifying purchases.