pfSense and Tor
I have recently moved from a pfSense vm to dedicated hardware. I may move back, but while I was evaluating the system, I installed TOR ( The Onion Router) package on to my firewall to allow me to route traffic.
My requirements for tor are quite simple - Just function as another route and do DNS lookups, without impacting the rest of the network and it's workings. Unlike other tutorials, I run a DNS resolver on my pfSense box. I also want to be able to control the usage of tor and limit it if necessary, or make certain vms use it as a default route. For the purposes of this post, I am going to assume you already have pfsense up and running.
Please note this doesn't automatically make you anonymous by using this server - in fact this is probably the worse thing you can do for being anonymous. This is intended for certain devices of mine to be able to access tor, without me needing to make a lot of modifications.
The initial install and setup
There is no formal package for tor in pfsense. While I understand that is netgate's choice I'm not sure I'm fully on board with this. The package is not generally available in the pfsense repos either, so the first stage is to enable the FreeBSD repos. This is done in 2 places. The places are:
/usr/local/etc/pkg/repos/FreeBSD.conf
/usr/local/etc/pkg/repos/pfSense.conf
In both cases, change:
FreeBSD: { enabled: no }to
FreeBSD: { enabled: yes }Once complete, install the tor package with the command:
pkg install torThis may highlight a mismatched kernel and require pkg itself to be updated. These should be safe to ignore and do, respectively. The next stage is to configure tor itself. Replace the contents of /usr/local/etc/tor/torrc with:
DNSPort ListeningIP:5350
VirtualAddrNetworkIPv4 10.192.0.0/11
AutomapHostsOnResolve 1
RunAsDaemon 1
TransPort 9040
The "ListeningIP" part needs to be replaced with the interface that you wish to be assigned to tor. This could be localhost, the lan or it could be a virtual ip address that you have created for the task. I use 127.0.0.1 for my setup.
The final stage from the command line is to make the service start automatically on reboot. This is done by creating /usr/local/etc/rc.d/tor.sh and making it executable. The file should contain:
/usr/local/bin/torThe file is made excutable by running the command:
chmod 0755 /usr/local/etc/rc.d/tor.shThe configuration in the gui
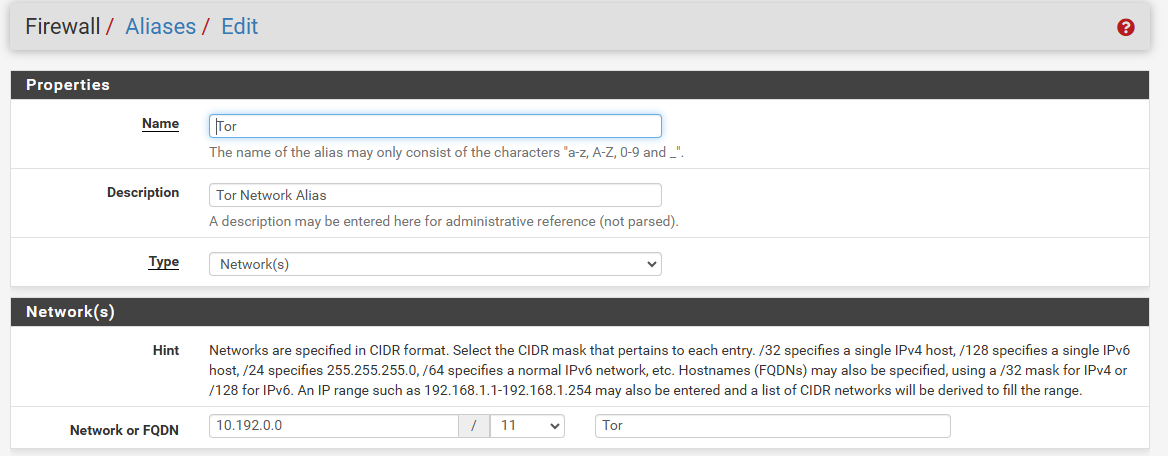
The first stage is to set up an alias for the tor subnet, as specificed in the torrc file (VirtualAddrNetworkIPv4). This allows you to control the traffic to / from tor in a more readable way. This is done in Firewall -> Aliases -> New.

Once saved, you can now reference "Tor" in your rulesets. The next thing to do is set up redirect rules to allow your network to talk to the tor nodes.
The next thing to setup is DNS. I am assuming you already have a working DNS server, but now you also have a DNS service listening on 5350, on the ip of the interface you chose before. In order to redirect queries via tor, we need to add the domain, .onion, to the resolver's configuration. Under the custom options section of Services -> DNS Resolver -> General settings, add the following:
server:
domain-insecure: "onion"
private-domain: "onion"
do-not-query-localhost: no
local-zone: "onion." nodefault
forward-zone:
name: "onion"
forward-addr: ListenIP@5350
This configuration makes unbound use ListenIP on port 5350 to answer queries about the TLD .onion. It doesn't magically route all DNS via tor.
If you already have a server section in your custom configuration, you can just omit the server: line when adding the configuration below the existing section. Once down, confirm that you can now look up onion addresses, and get a response in the VirtualAddrNetworkIPv4 range. For example, http://haystak5njsmn2hqkewecpaxetahtwhsbsa64jom2k22z5afxhnpxfid.onion/ is the haystak search engine.
The next stage is to handle the translation of traffic to the Tor range. Tor uses port 90 I allow only 3 types of traffic to go out via tor namely http, https and ssh. All traffic types could be allowed by simply doing an "any" translation when asked for the port. Under Firewall -> Nat -> Port forward, I create a rule for each interface I want to allow to talk to tor using the following format:
Interface: The interface to allow, e.g - Lan
IP Address family: IPv4
Protocol: TCP
Desination: Address or alias - Tor (my alias as set earlier)
Port: the port you want to map, any for all, http for me.
Redirect Target IP: Address or Alias - 127.0.0.1 (my ListenIP from the config)
Redirect target port: Other - 9040 (this is tor's default)
Don't forget to give it a description and click save. Add more rules if necessary, reload the firewall once down.
Lastly, now you need to create rules for passing the data to Tor. This can be as simple as allowing anything to talk to the Tor alias list on any port.
Once complete, you should now be able browse Tor to your hearts content. Just watch where you go, eh?
Update: If you do install an updated version of pkg, this might break your web interface slightly. To fix, you may need to reverse the steps to add the freebsd repos (ie, from yes to no) and then reinstall pkg using the command
/usr/local/sbin/pkg-static install -yf pkg