eMotion and Modbus
As I write this, Paul Hibbert released this video on youtube 3 days ago. The video features a very smart sensor doing presence detection. The company linknlink were new to me and following the recommendation from Paul, I bought a couple of eMotion sensors. If you want to follow along, Paul has a discount code and links on the videos.
At the end of the video, Paul mentioned that he hadn't connected them to his Home assistant instance because the modbus configuration wasn't straight forward. This did spark my curiosity, as I hadn't played with modbus before and was a bit curious on the setup. I purchased 2 of the emotion devices from Amazon, and they arrived Monday.
Basic Assumptions / Requirements
I am going to assume the following:
You have home assistant setup and working. You also should be happy with editing the configuration files.
You know how to set a static IP address for your network which will not clash with your router (either static or a set dynamically assigned one is fine). This is necessary so home assistant can always find the device.
You have set up the linknlink device up to talk to your wifi and assigned it a static IP address.
Getting stuck in
For the last part, to assigning the address to the device yourself (ie, not via your router), you can go to the modbus page. This is reached in the linknlink app by clicking on the device, then the three dots in the top right corner and selecting modbus. You will need to go to this page anyway, as it has some information you will need. The screen should look something like this:
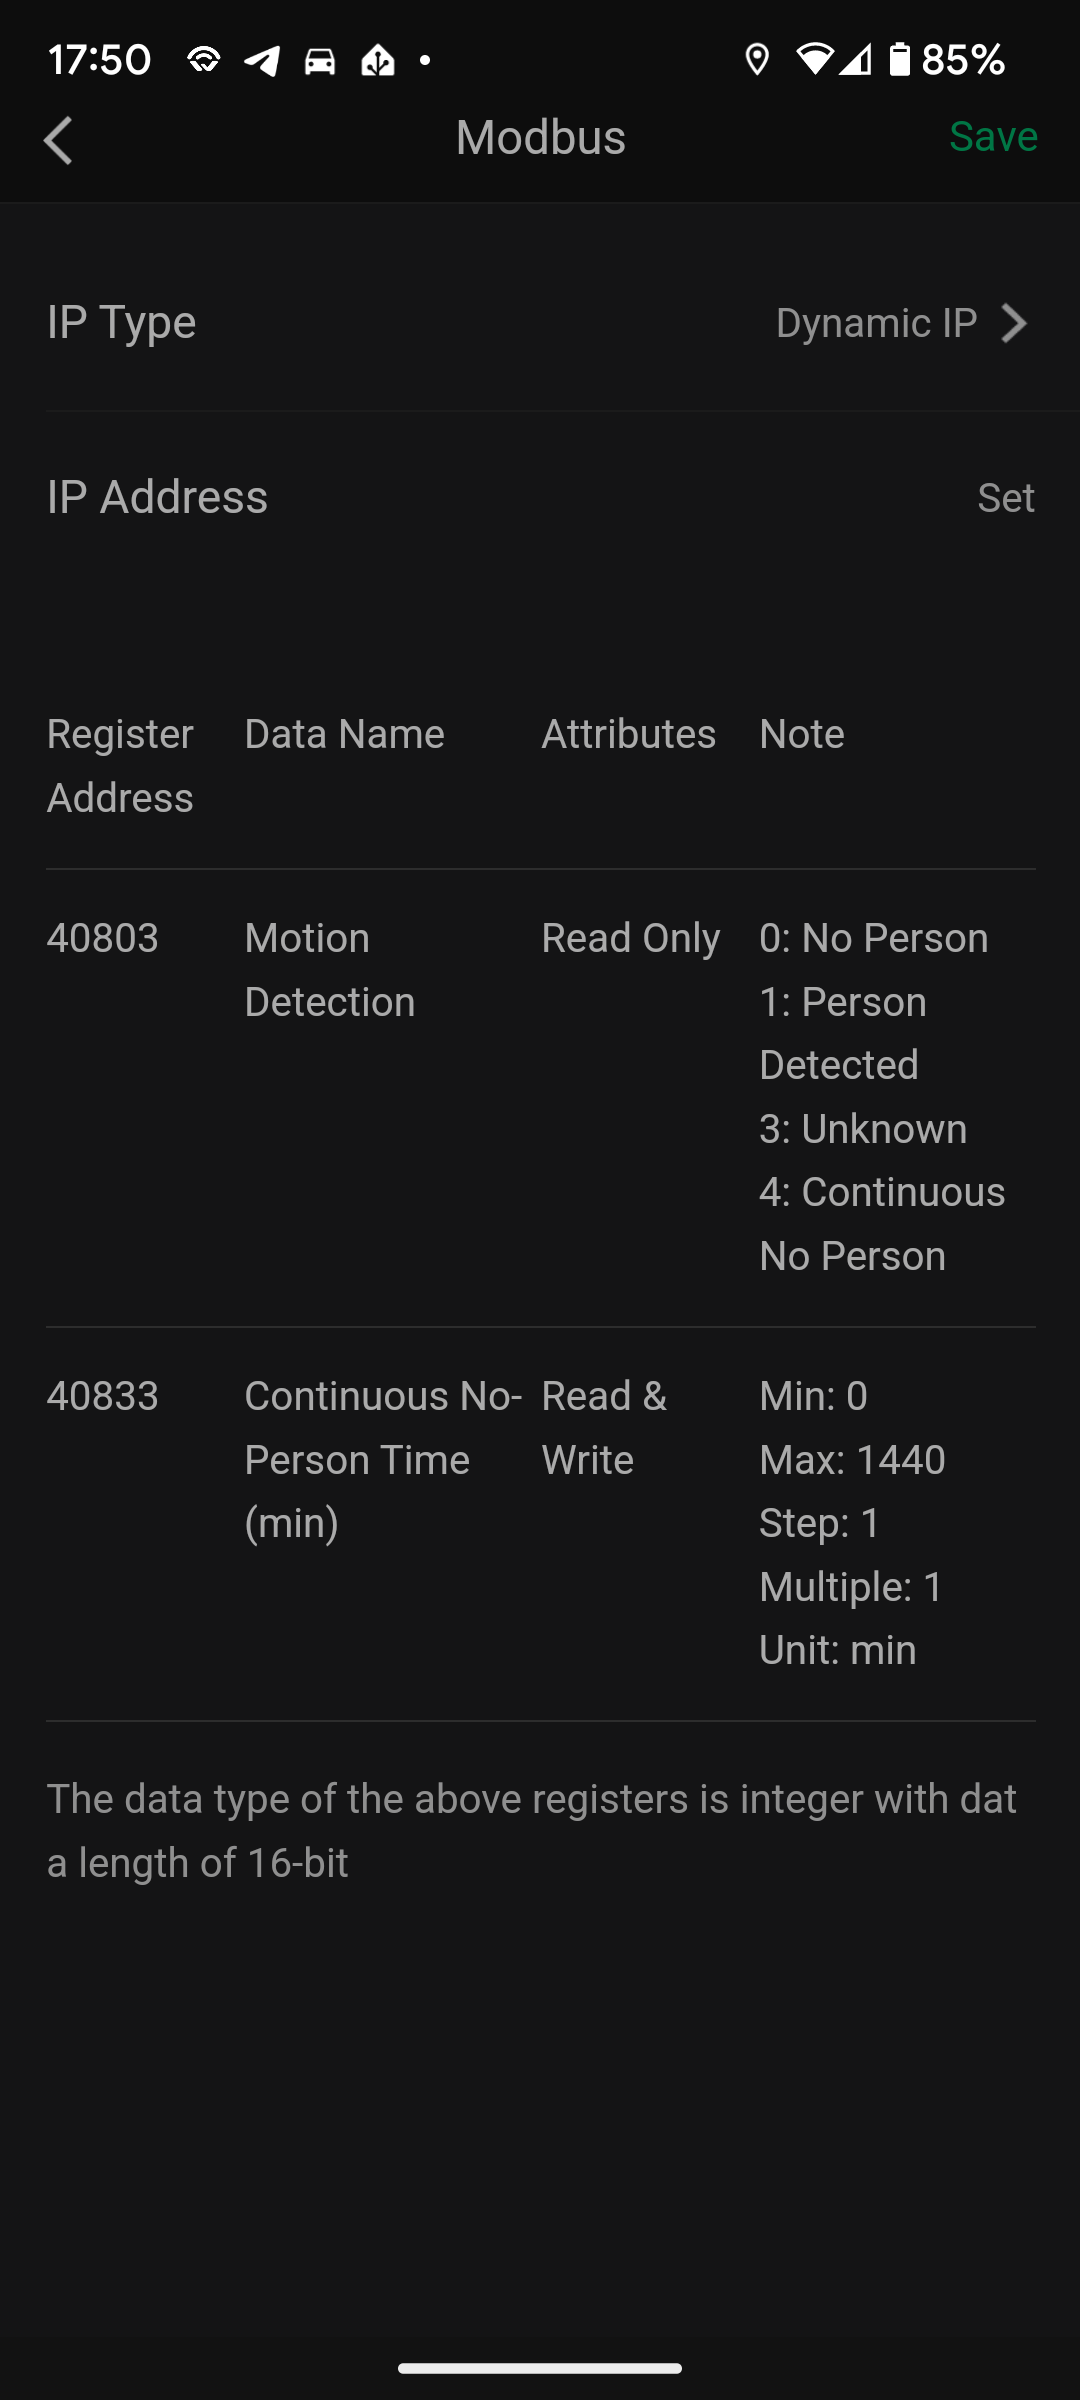
The things we need to are the register addresses for each value we are interested in, along with the notes. The notes show what the values mean.
To configure modbus, I suggest you start by adding the following line to configuration.yaml, if it isn't already present.
modbus: !include modbus.yamlThis includes a separate configuration file called "modbus.yaml" to be included in the configuration. If you break anything or give up, just comment this line out if it's going to break your configuration.
The next stage is to create the modbus.yaml file. This file should look like this:
# modbus:
- name: 'office emotion'
  type: tcp
  host: <static ip address just set>
  port: 502
  sensors:
    - name: 'office emotion Motion'
      address: 802   # <--- register address, minus 1 and without the leading 40
      data_type: uint16
      scan_interval: 3
      slave: 1
    - name: 'office emotion no-person time'
      address: 832   # <--- register address, minus 1 and without the leading 40
      data_type: uint16
      scan_interval: 3
      slave: 1
The modbus type for the linknlink devices is tcp, and they are talking on port 502. Port 502 is also the default for modbus. Feel free to call the device whatever you like. In modbus, the device itself would be the "hub". The IP address will be the static one configured earlier.
For each register that we were interested in, I created a sensor in the configuration. The address of each sensor is the registry address without the leading '40'. Then, subtract one, because... reasons I guess. The data type is unsigned integer of 16 bits in size (uint16). The scan interval is set to 3 seconds and the slave is set to 1, as this is the first set of sensors.
Once set up, don't forget to test your configuration and reload. Once Home assistant restarts, you should be able to find your new states in the developer tools.
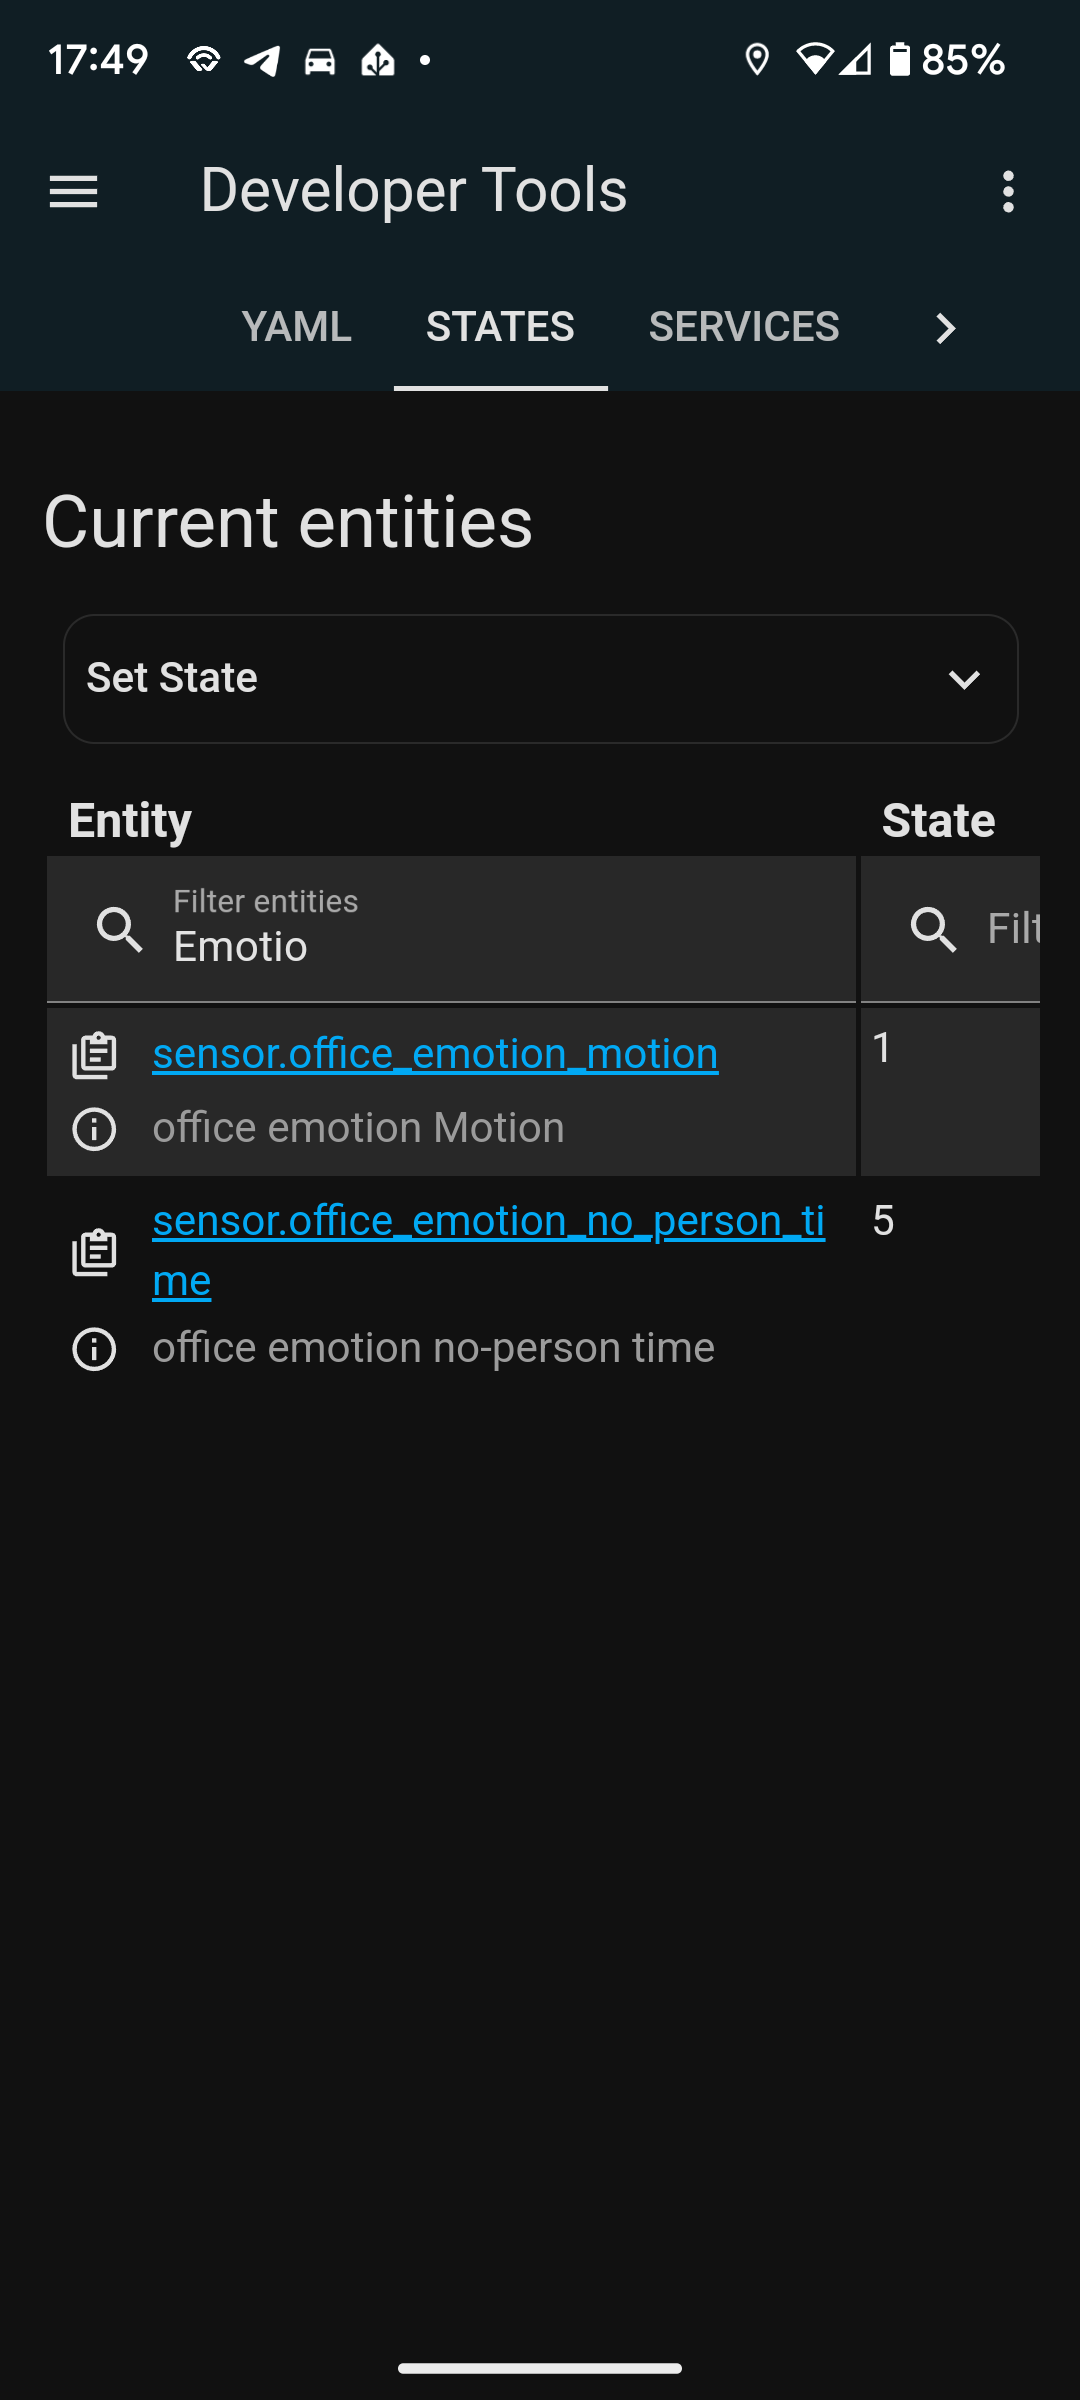
Once complete, you can add the motion sensor to a home assistant automation as a trigger via the state change. A change from 0 to 1 indicates that someone is present.
About the author
Tim Wilkes is a UK-based security architect with over 15 years of experience in electronics, Linux, and Unix systems administration. Since 2021, he's been designing secure systems for a telecom company while indulging his passions for programming, automation, and 3D printing. Tim shares his projects, tinkering adventures, and tech insights here - partly as a personal log, and partly in the hopes that others will find them useful.
Want to connect or follow along?
LinkedIn: [phpsytems]
Twitter / X: [@timmehwimmy]
Mastodon: [@timmehwimmy@infosec.exchange]
If you've found a post helpful, consider supporting the blog - it's a part-time passion that your support helps keep alive.
⚠️ Disclaimer
This post may contain affiliate links. If you choose to purchase through them, I may earn a small commission at no extra cost to you. I only recommend items and services I’ve personally read or used and found valuable.
As an Amazon Associate I earn from qualifying purchases.